
Download Our Rainwater System Care guide Here
Feel free to read it here on the web, or share your email to access the downloadable version.
the team at

Rainwater System Care Guide
The essentials for keeping your rainwater system healthy and your water secure, year after year.
Section 1
About Rainwater Exchange
Your rainwater partner from first question to lifelong care. This guide is about the care that keeps a system running for decades.
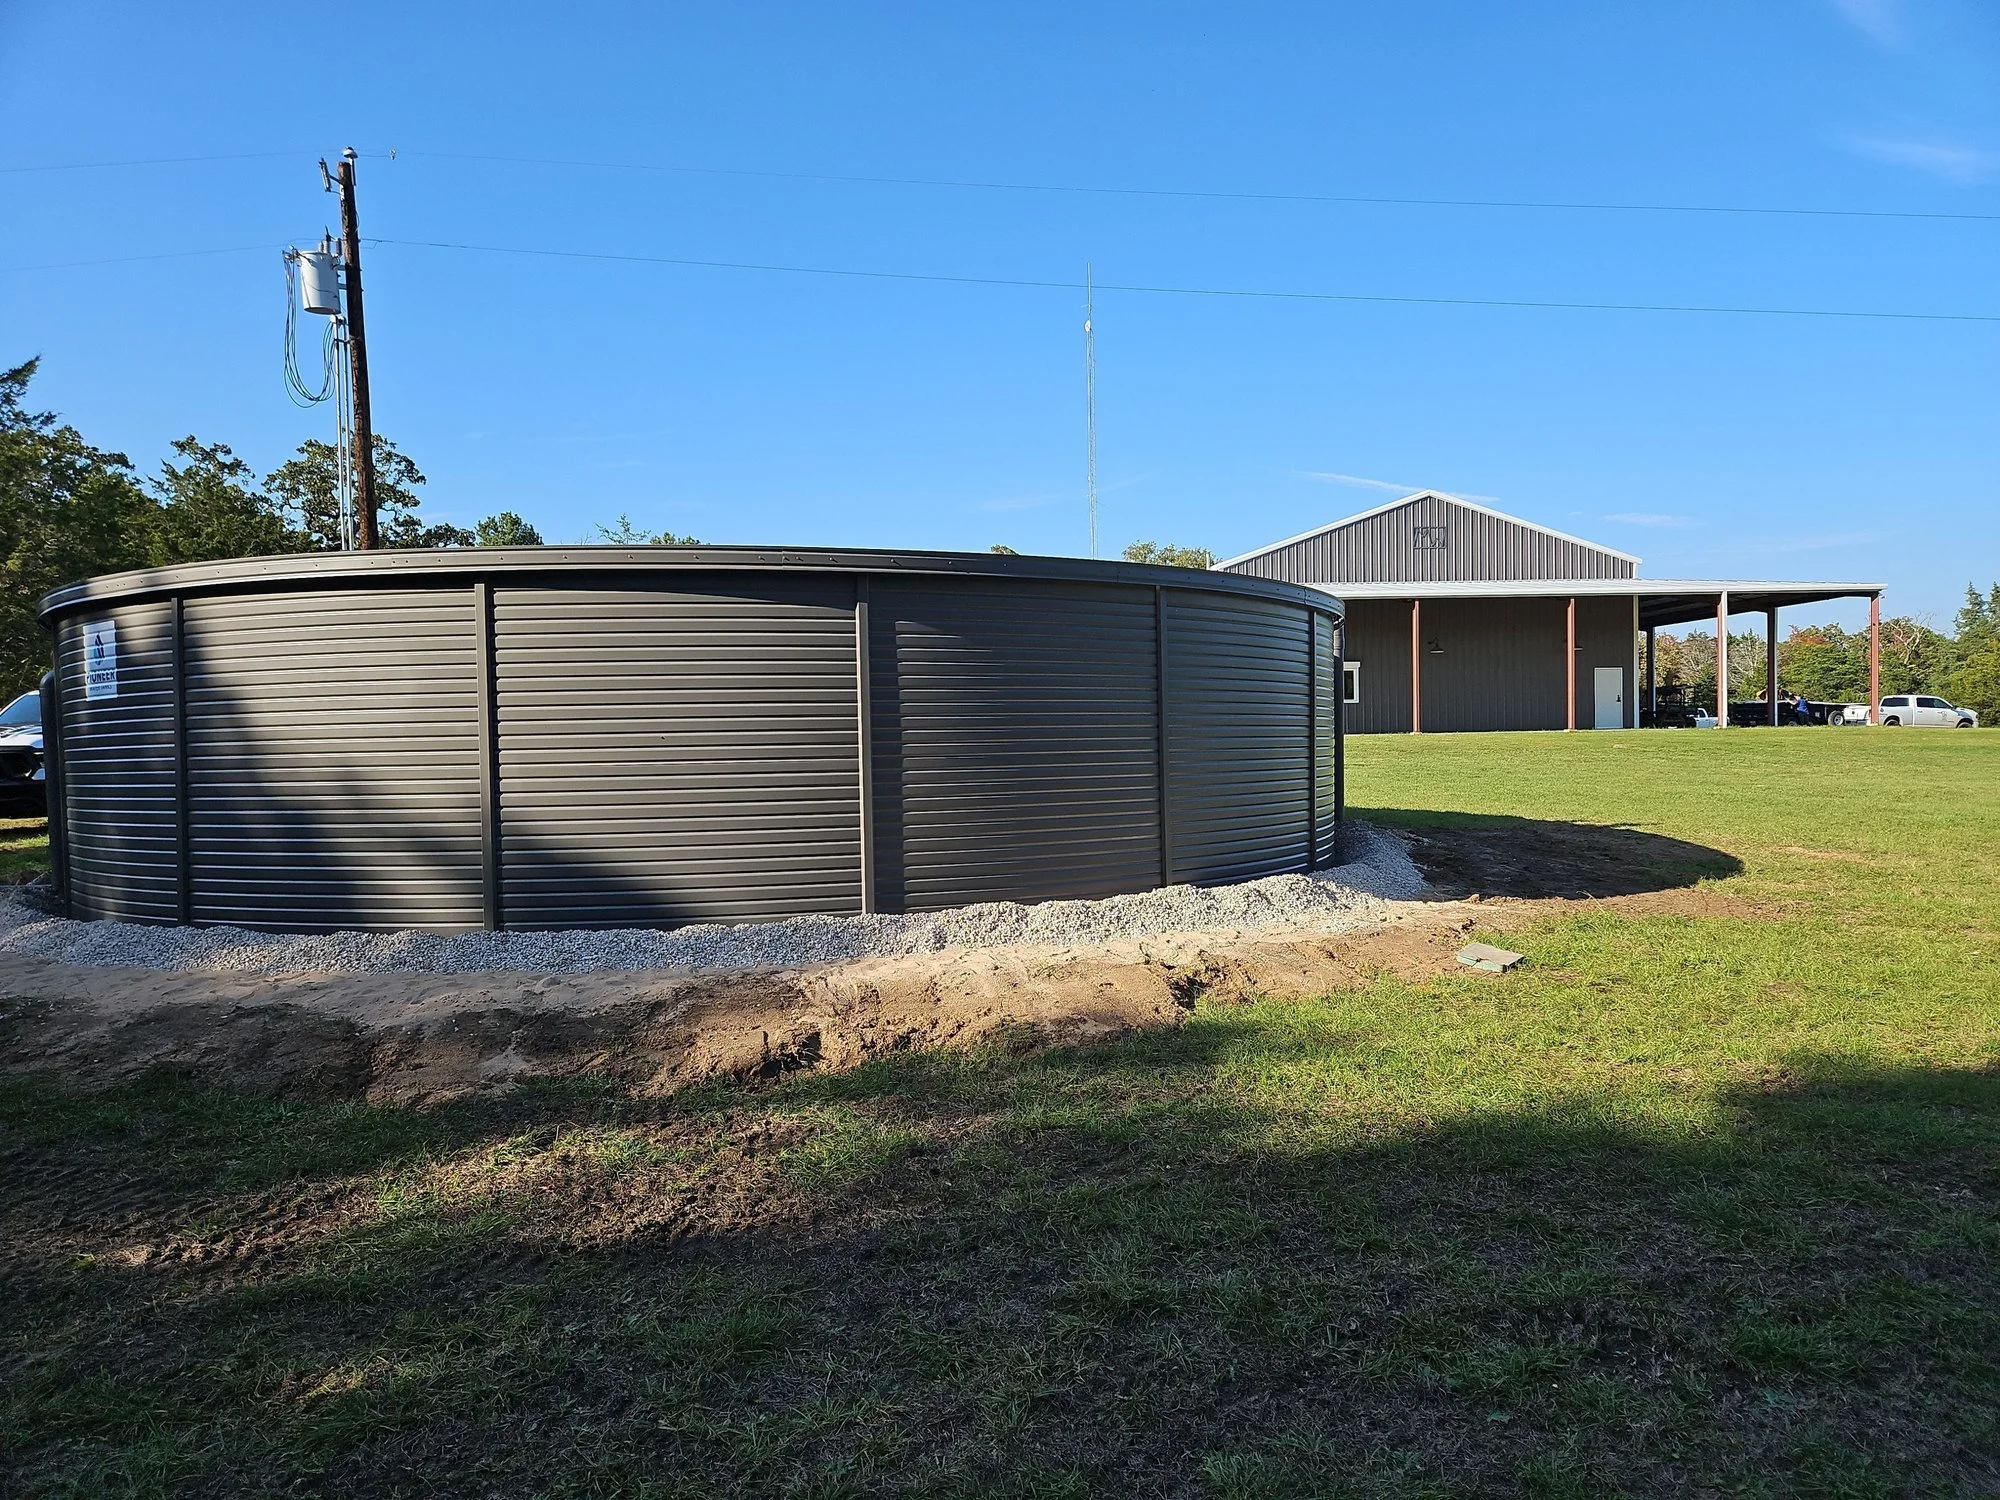
Rainwater Exchange is building infrastructure for rainwater harvesting, and long-term care is at the center of it. We were founded by the leadership at Cqure Water, who have installed more than 600 whole-home potable rainwater systems over fifteen years. Our mission is to make rainwater harvesting the obvious first choice for water security.
Today we look after hundreds of systems across Texas, installed by a range of different companies. Over the years, we’ve seen how often a system gets left alone after it’s installed. Installation companies are built around project-based work, and maintenance runs on a different rhythm entirely. We built a team designed for that rhythm: long-term, ongoing care — whoever put your system in.
Platform for the rainwater harvesting industry
- Service and maintenance — annual, bi-annual, or seasonal plans for routine service in Texas. One-off repairs and replacements as needed. rainwaterexchange.com/service-and-maintenance
- Parts and kits — the parts your system needs for routine service every year, boxed and shipped on schedule, anywhere in the US. rainwaterexchange.com/parts-and-guides
- Remote monitoring — system health tracked in the background, so problems surface before you notice them.
- Certified installers — we match homeowners with an installer in our network who has met our standards for quality.
- Education — guides like this one, the rainwater calculator, and a library dedicated to growing the practice of rainwater harvesting.
How to use this guide
Section 2 is the routine service every whole-home rainwater system needs at least once a year, and twice a year if you can. It’s written as a checklist first, then the same sequence again with the detail behind each step.
Section 3 covers what falls outside routine: freezes, power outages, and common troubleshooting. The last section covers when to stop and call us.
We wrote it for everyone. If you service your own system, everything you need is here. If you’d prefer we service it, this is what we’ll be doing and why.
We update this guide periodically, both to make it more comprehensive and to keep it current with what we learn in the field.
Section 2
Routine care
Once a year at minimum. Twice a year is what we recommend.
Filter manufacturers specify cartridge replacement every four to six months. Rainwater is cleaner than well or municipal source water, so an annual interval can work well depending on your situation. A twice-yearly interval keeps you inside the manufacturer’s specification and keeps water quality and pressure optimal throughout the year.
What changes when
| Item | Minimum | Recommended | Optimal |
|---|---|---|---|
| Sediment filter | 12 months | 6 months | 3 months |
| Carbon filter | 12 months | 6 months | 6 months |
| UV lamp | 12 months | 12 months | 12 months |
| Quartz sleeve | Clean and inspect at every lamp change. Replace when damaged. | ||
| Housing O-rings | Inspect whenever a housing is opened. Replace when over-stretched or damaged. | ||
| Inlet basket | 12 months | 6 months | 3 months |
| Low point drain flush | 12 months | 6 months | 3 months |
| Tank inspection and leak detection | 12 months | 6 months | 3 months |
Routine service checklist
At the treatment panel
- Prepare
- Confirm your lamp part number and filter housingsMake sure you have the right UV lamp and filter size
- Shut down
- Secure water and turn off at both inlet and outlet
- Depressurize the system using the hose bibIf there is no hose bib, you can press the black buttons on top of the housings, for VIQUA systems
- Unplug the UV controller from the outlet
- Drain
- Drain the sediment sump
- Drain the carbon sump
- Service
- Clean and sanitize the sumps, and put the drain hardware back
- Add the new filters and reattach the housings
- Remove the old UV lampHandle by the ends only
- Clean the quartz sleeve and reinsert itHand tight only
- Put the new UV lamp in
- Restart
- Plug the UV controller back into the outlet
- Reset the lamp timer365 days on VIQUA, 420 on Luminor. Check the light is green
- Flush 5 to 10 gallonsWater on slowly. Ready when it runs clear with no bubbles
- Check for any leaks
- Open water fully on both endsClose the hose bib first
- Clean up the areaConfirm timer, green light, and no leaks
Routine service checklist
At the tank
- Inlet and line
- Check the collection is holding waterShake the candy cane, the pipe that is the inlet to the tank. Listen for water inside
- Empty the inlet basketLid off, basket out, washed. Gloves — the metal is sharp
- Flush the collection lineLow point drain, pulled slowly, until the water comes clear
- Tank
- Look inside the tankWater level against the gauge, riser secure and upright
- Walk the outside of the tankSeams, pad, shifted pipe, outlet, electrical, overflow path
- Check the first-flush, if you have oneChamber drained, outlet at the base clear
2.1 Confirm your lamp part number and filter housings
Confirm two things before you order anything: the UV lamp part and the filter housing size.
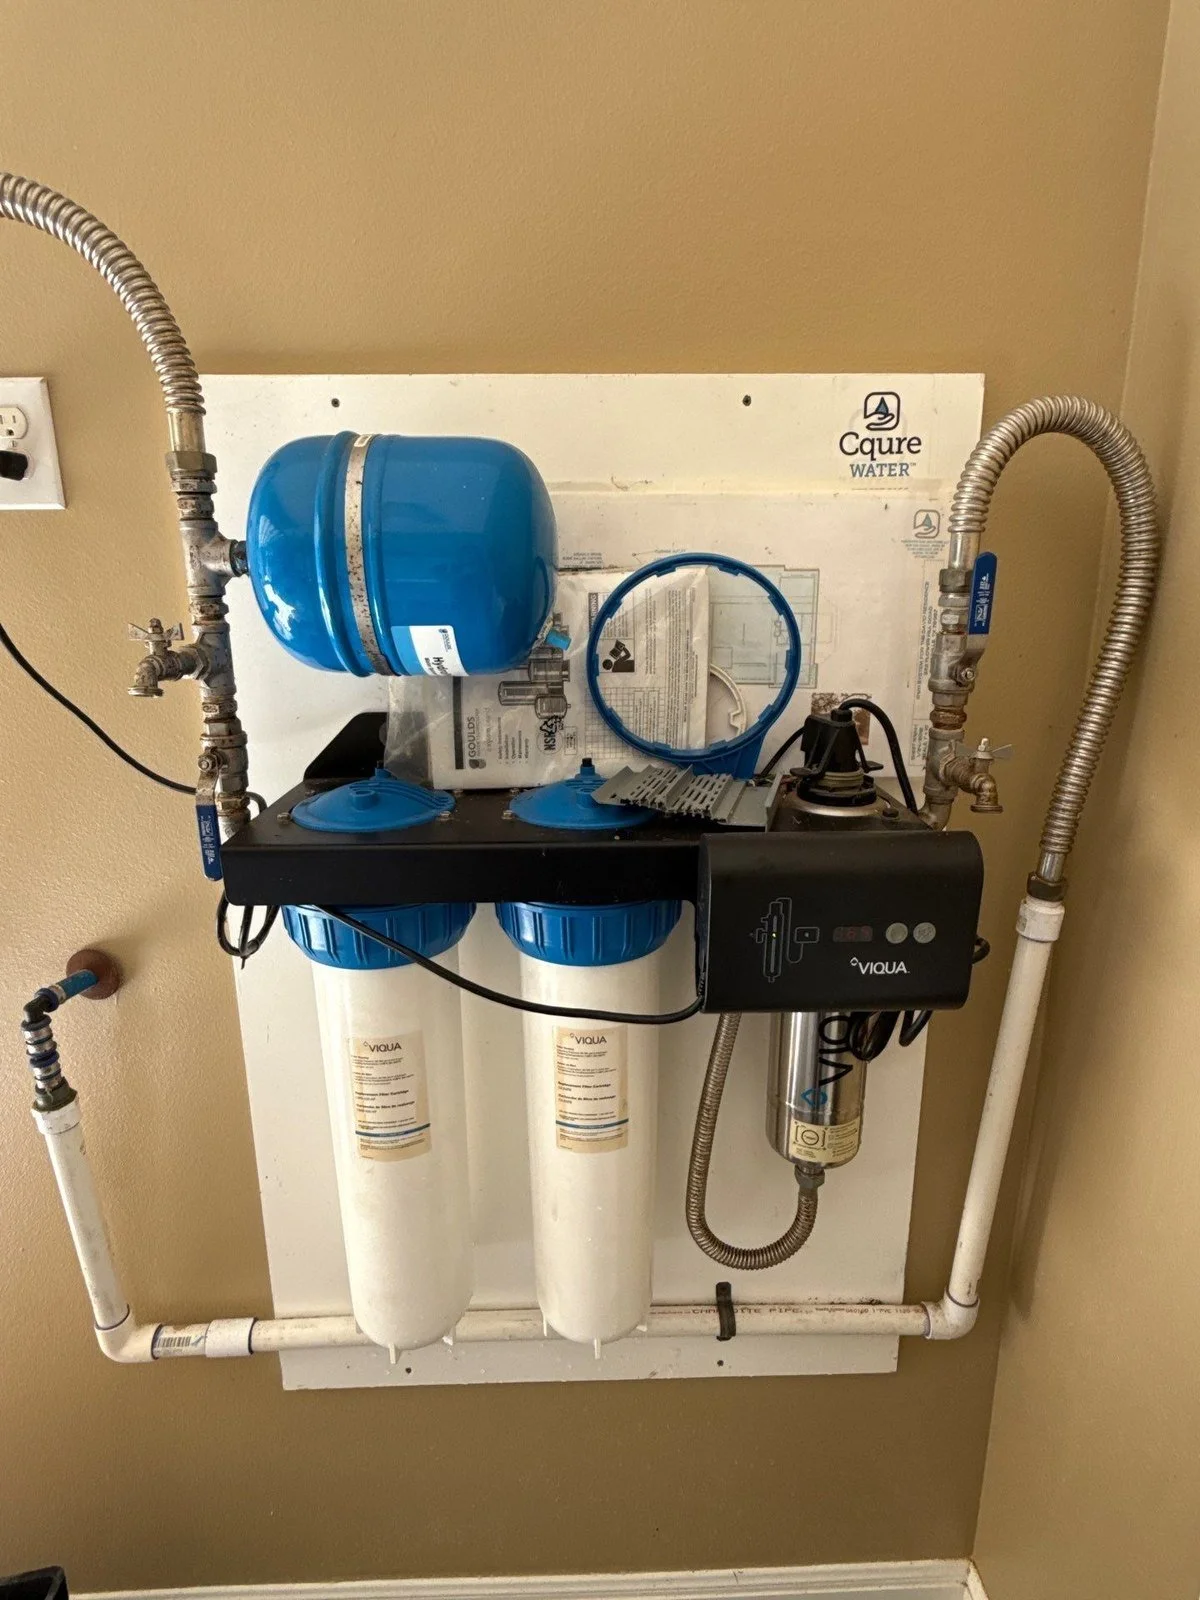


VIQUA
| Models | Lamp |
|---|---|
| D · D4/PLUS · D4-V | 602805 |
| E · E/PLUS · E4 · E4/PLUS · E4-V | 602806 |
Luminor
| Models | Lamp |
|---|---|
| LBH4-151 · LBH5-151 · LBH6-151 Blackcomb-HO, 15 GPM rack | RL-420HO |
Luminor systems built from mid-2017
These use Lightlock. The controller and the lamp identify each other, and the system will not run an aftermarket lamp.
Filter housings
The standard configuration on many systems is two 4.5" × 20" housings, usually called Big Blue. First stage is a 5-micron sediment filter. Second stage is a 10-micron carbon filter.
Some installs use 10" housings, so be sure to check your system’s size.
Parts and tools to have on hand
Parts
- UV lamp for your model
- 5-micron sediment cartridge
- 10-micron carbon block
- Housing O-rings
- Waterproof plumber’s grease
- A spare quartz sleeve
Tools
- The plastic housing wrench that came with the system
- A bucket, and towels
- A garden hose
- A screwdriver
- Clean wipes or paper towels
- 3% hydrogen peroxide
Safety
- UV lamps contain a small amount of mercury. Handle them very carefully.
- The housings are pressure vessels. Don’t open one that hasn’t been depressurized.
We recommend photographing the panel as it stands before starting: valve positions, controller display, how the plumbing runs.
2.2 Secure water and turn off at both inlet and outlet
Shut the water off on both sides of the treatment panel. Nothing should be able to push water into the panel or draw it out while you’re working. If there isn’t a valve on the inlet, you may have to shut off your pump.
2.3 Depressurize the system

Attach a hose to the hose bib and drain the excess water into the bucket. That releases the pressure held between the closed valves. Leave the bib open while you work.
If there’s no hose bib on your system, you can use the black pressure relief buttons on top of the sumps instead, if you have VIQUA housings.
2.4 Unplug the UV controller from the outlet

We generally recommend unplugging the UV controller from the outlet at the wall. Make sure there’s no live power while you’re changing the filters and the UV lamp.
2.5 Drain the sediment sump
There’s a drain screw on the underside of the sump — a bolt on VIQUA, a drain plug on Luminor. On VIQUA, use a screwdriver to back the bolt out. On Luminor, use the bottom side of the wrench to loosen it. Draining before you unscrew the sump releases the water held in the housing and makes changing the filters easier.
Set the bolt or drain plug somewhere you won’t lose it. They’re small and specific to the housing, and a missing one ends the service.
2.6 Drain the carbon sump
Same thing on the second housing. The carbon sump is heavier than the sediment one.
2.7 Clean and sanitize the sumps, fit the new cartridges, and put the drain hardware back
-
Unscrew the sump
Seat the wrench and turn the housing to the left. Loosen it with the wrench, then finish by hand. Lower it straight down and set it in the bucket.
-
Pull the old filters out and examine them
A stained sediment cartridge is normal. If it’s black or holds quite a bit of sediment, this is your cue to replace it more often.
-
Wipe the sump out
Use a clean towel or paper towel to wipe out the sediment and carbon sumps.
-
Sanitize it
Wiping the sumps with a clean towel gets you most of the way there, since the water enters the UV chamber after this stage. If you’d like to sanitize further, apply 3% hydrogen peroxide to a clean towel and wipe the sumps with it.
-
Put the drain bolt or plug back
Best to screw the bolt or drain plug back on while the sumps are empty.
-
Re-grease or replace the O-ring
On VIQUA systems the O-ring sits in the first indent at the top of the housing. Try reusing the existing O-ring first: apply waterproof grease to it before seating it. VIQUA O-rings stretch over time, so if it needs replacing, grease the new one the same way.
On Luminor systems the O-ring sits on top of the housing, wedged in between, so it shouldn’t need replacing often.
-
Seat the new cartridge and close the housing
On VIQUA, press the sump firmly into the housing cap, then lock it with the lock-ring. Tighten the lock-ring by hand first, then finish tightening with the wrench.
On Luminor, rotate the sump clockwise into the cap and finish tightening it with the wrench.


2.8 Replace the UV lamp
This is the part to be extremely careful with. UV lamps are fragile, and breaking one is both expensive and time spent without treated water.


VIQUA
Pull the lamp connector off the top of the UV chamber. Unscrew the lamp and slowly withdraw it straight out.
Luminor
Push the lamp connector in, rotate counterclockwise, and the lamp springs out slightly. Hold the cord with one hand, steady your grip on the blue part of the lamp with the other, and wiggle the cord gently back and forth until the lamp releases from the pins.
Wrap the old lamp in the bubble wrap the new one came in.
The quartz sleeve
The quartz sleeve keeps the lamp out of the water while letting UV light pass through to it, so it has to stay clear to work. Clean it with a mineral removal product such as vinegar or CLR, rinse it, and put it back. If it’s badly fouled or won’t come clean, replace it, following the manufacturer’s instructions for the lamp and sleeve.
-
Draw the sleeve out straight
The retaining nut should come off by hand. Gloves on, or a clean cloth in your hand, and support the far end as it clears the chamber. If it doesn’t move, twist it gently rather than pulling harder.
-
Never handle it with bare fingers
Skin oil bakes onto hot quartz and leaves a patch that blocks UV. If you touch it, clean it with isopropyl before it goes back in.
-
Clean it
For mineral haze, a mineral removal product such as CLR, or white vinegar, on a soft lint-free cloth. Rinse and dry.
-
Inspect it against the light
If you see chips at either end, especially where the O-ring sits, hairline cracks, scratchiness, or cloudiness that won’t come off, replace the sleeve.
-
Put the sleeve back
Fresh O-ring, lightly greased, seated in its groove. Thread the nut on hand tight only. Overtightening can crack the sleeve.
-
Fit the new lamp
Never touch the glass — handle the lamp by the ends. On VIQUA, slide the lamp in and press the connector on until it seats. On Luminor, push the connector onto the pins, wiggle the lamp in using the same technique of holding the end of the lamp with one hand and the cord with the other, and rotate clockwise until it locks.
2.9 Reset the lamp timer


Plug the controller back in the outlet and reset the countdown: 365 days on VIQUA, 420 on Luminor. On VIQUA, hold the reset button for about five seconds. On Luminor there’s only one button, and holding it for about fifteen seconds resets it.
Check that the light on the controller is green on either system.
2.10 Flush 5 to 10 gallons

Turn the water on slowly at the inlet side. A quarter turn, then wait, and listen to the housings fill. Don’t turn the water on all the way right away.
With the outlet still closed and a hose on the output hose bib, flush 5 to 10 gallons through the system to clear loose carbon. Purge the air out at the same time — let it run until the sputtering stops. If you don’t have a hose bib, turn the water to the house back on and run the cold tap in a bathtub for several minutes.
The water is ready when it runs clear and there are no bubbles in the line. Grey water at this stage is carbon dust and is expected.
2.11 Check for any leaks
Examine the housings for leaks to confirm you reinstalled them correctly. Leaks at the hose bib are common — put a bucket underneath to keep the space clean.
If one of the housings is leaking, turn the water off, depressurize the system, remove the housing, examine the O-ring, and try again.
2.12 Open water fully on both ends
Close the hose bib, then open the inlet and outlet valves fully.
2.13 Clean up the area
Empty the buckets, dry the floor, and take the trash with you. Confirm the controller timer is reset and the light is green.
2.14 The tank and the collection side
We recommend checking the tank every time you service the system. These are good practices at least once a year, and bi-annually or seasonally for optimal system health.
-
Check the collection is holding water
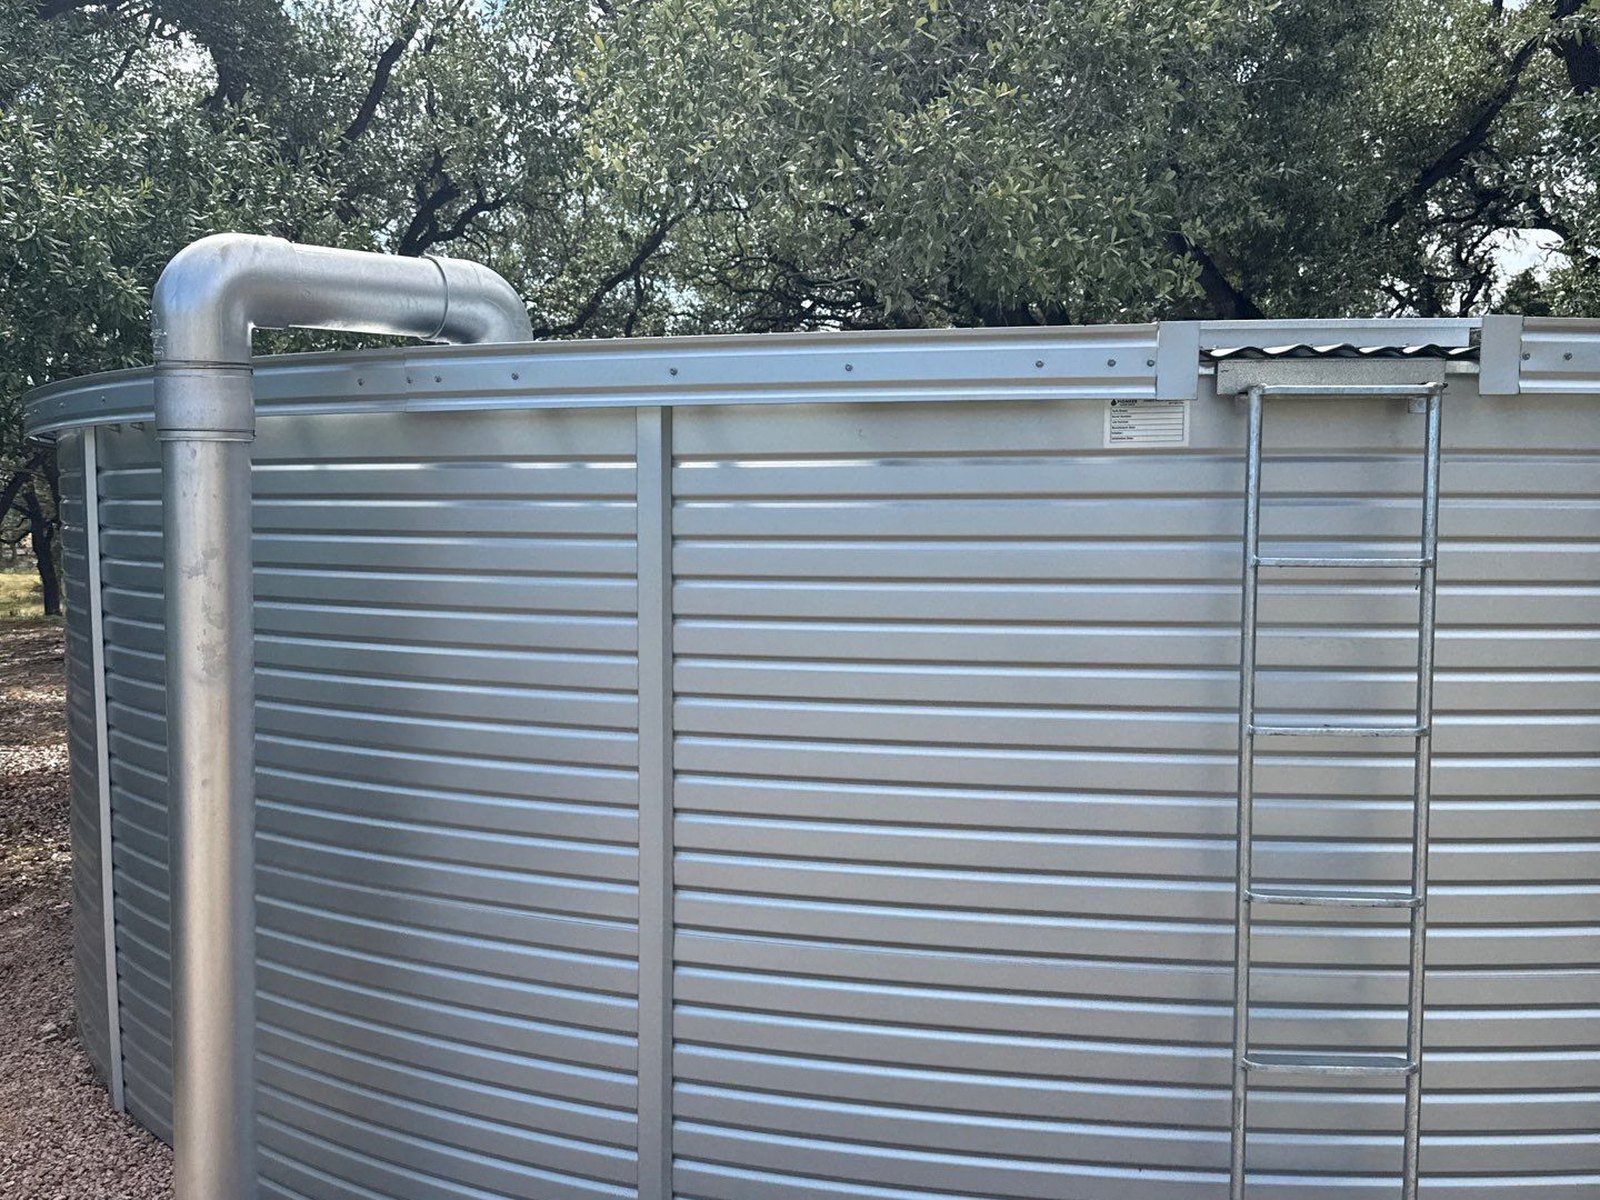
The candy cane, the inlet pipe that carries water up and over into the tank Shake the candy cane, the inlet pipe that carries water up and over into the tank. You should hear water in the pipe when you shake it. A wet system keeps the line full between rain events, so water sitting in there confirms there isn’t a leak in the pipes.
-
Empty the inlet basket

Leaves and grit collected in the inlet basket 
The same basket emptied and washed If you have a Pioneer tank, your system should come with a ladder. Pull the ladder off the rack and turn it over so the metal part is on the ground. If your system doesn’t have one, any ladder will do. The Pioneer ladder isn’t as stable as most, so be careful.
Open the lid and lift the basket out. The metal of the tank and the basket is sharp, so consider wearing gloves. Pull the lid out carefully to avoid dropping anything into the tank, including the inlet basket. Empty the basket and wash it with a hose. Once the basket is back in, close the lid and make sure the inlet pipe is snug inside.
-
Flush the collection line
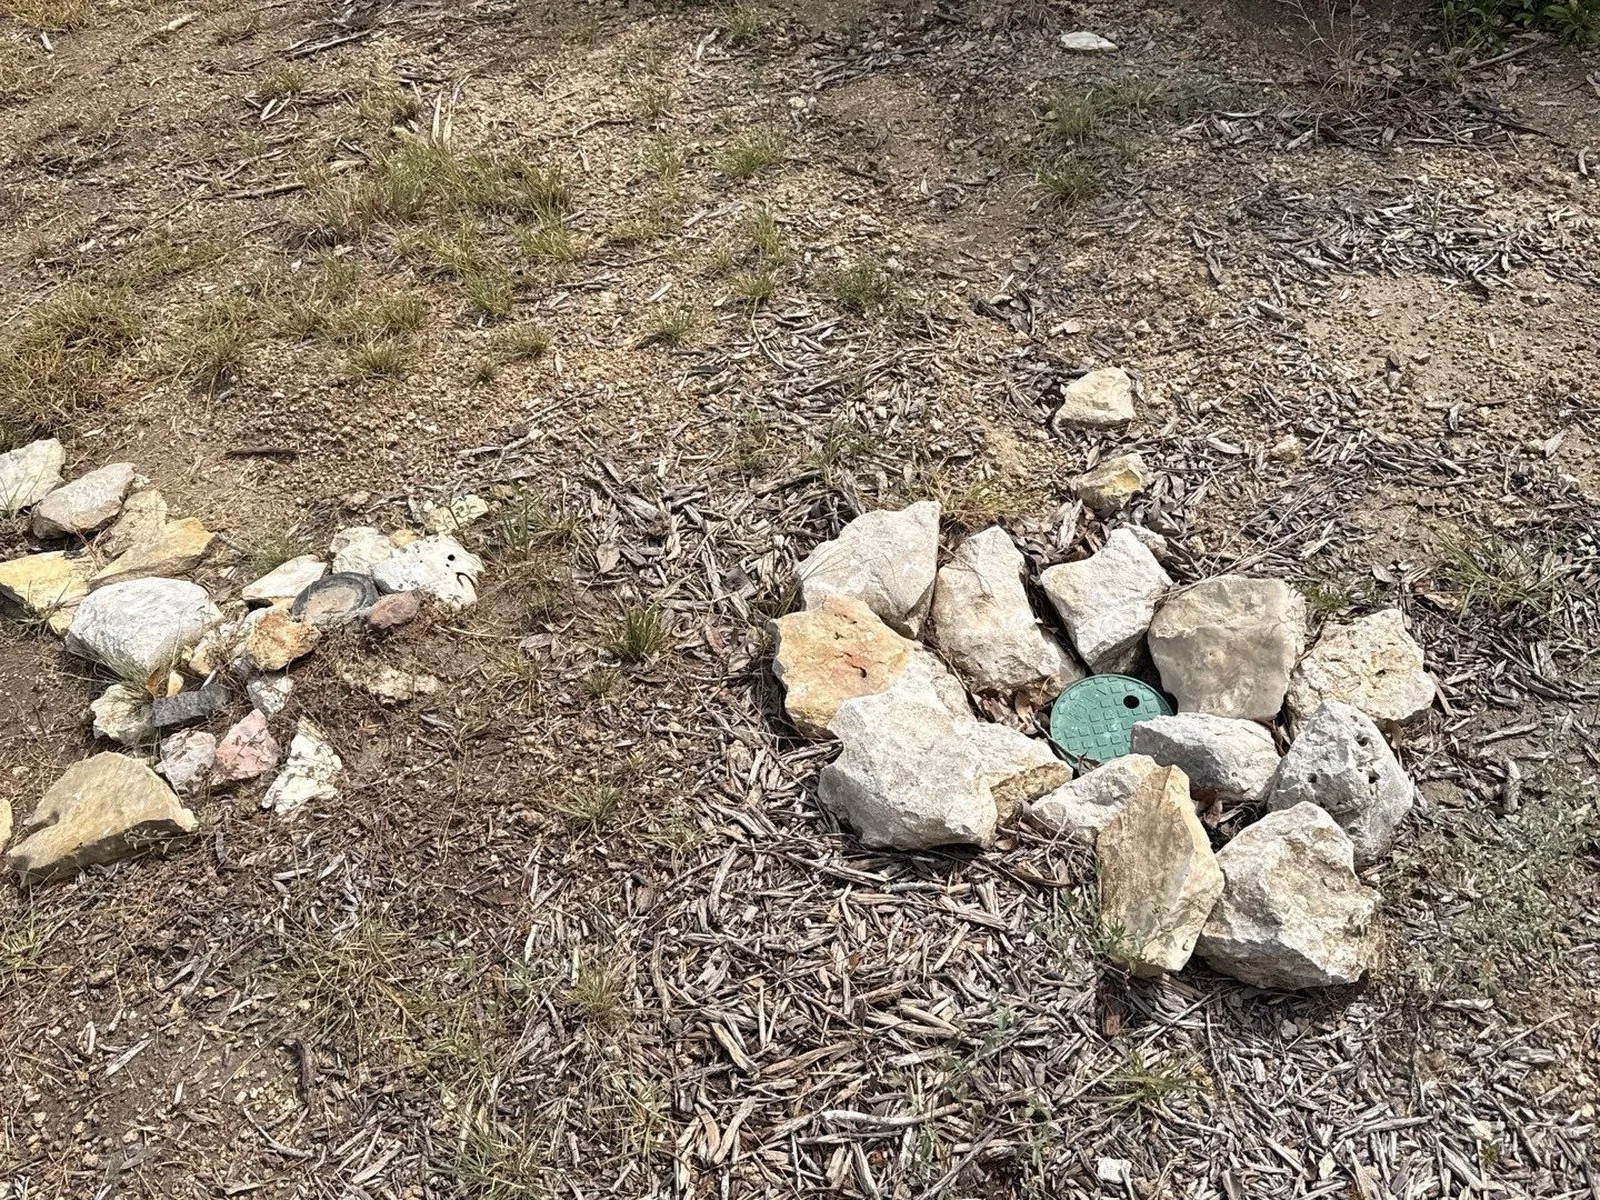
The low point drain, a green valve box set in the ground 
Flushing, until the water runs clear Find the low point drain, pull it slowly, and let the water run until it comes clear. Be sure to close it again when you’re done.
-
Look inside the tank
Open the hatch and check the water level. It should match what the gauge reads. Make sure the riser is secure and upright.
-
Walk the outside of the tank
Check the exterior for signs of leaks or damage: mineral deposits or drips on the exterior and along the seams, erosion running off the tank, pad material undercut or washed out, shifted pipes, damaged electrical. Check for leaks around the tank outlet and any other connections, including a fire connection if you have one.
Make sure the overflow has a clear path for water to run and doesn’t drain back onto the tank pad.
-
Check the first-flush
If your system has a first-flush diverter, check that the chamber has drained and that the small outlet at its base is clear, since that’s the part grit and leaf fragments block. If yours empties through a manual valve rather than draining on its own, open it after each rain event.
Self-service, or serviced by us
This guide is written to work either way.
If you prefer to maintain your own system, our service kits carry the right lamp, cartridges, and seals for your exact system, boxed together and shipped before they’re due. We’ll help you keep track of when your service is due, and you’ll have us on text or call for support. rainwaterexchange.com/parts-and-guides
If you’d rather, we can take care of the service for you. Our annual, bi-annual, and seasonal plans cover everything in this section, with a written report each time. rainwaterexchange.com/service-and-maintenance
Section 3
Freezes, outages, and other edge cases
What to do when something falls outside the routine.
3.1 Freezes
Water expands when it freezes. A filter housing full of water that freezes will crack, and so will the quartz sleeve inside the UV chamber. When temperatures are forecast below freezing over multiple days, three things get you most of the way there.
Insulate
Insulation protects your pipes from freezing and shattering, which can drain your tank. Use insulation meant for pipes — usually a black foam sleeve, though it comes in other colors. Pool noodles and similar substitutes won’t do the job. A blanket or mulch packed around the pipe adds margin if you want it.
The crucial points are the PVC exiting the tank and the PVC where water enters your home, garage, or well house. If those runs are underground rather than exposed, they don’t need insulating.
Make sure the area around your UV treatment board stays above freezing. Ice building up in the treatment board can shatter the filter sumps or the quartz sleeve in the UV chamber.
Drip a faucet
Dripping a faucet keeps water moving through the pipes, which lowers the pressure in the line and reduces the chance of standing water freezing.
Pick an indoor faucet and let it drip slowly, one or two drops a second, whenever temperatures are below 30 degrees. Overnight matters most, since that’s when temperatures bottom out. Around 40 degrees, or while the house is using water normally, dripping isn’t necessary.
Pull the low point drain
Pulling the low point drains the water sitting in the collection pipes, the run from your downspouts to your inlet pipes. It doesn’t affect the water in your tank, and it keeps the downspouts from expanding with ice and shattering.
The low point drain is usually close to the tank, though not always, about five feet from the inlet pipe and inside a green round valve box set in the ground. Inside is a gate valve with a plunge handle. Lift the handle slowly until the water comes to a stop, and leave it up so the valve stays open for the duration of the freeze.
After the freeze
Be sure to close the low point drain once the freeze has passed, so the collection line refills on the next rain. Look for hairline cracks in the housings and confirm there are no leaks.
3.2 Power outages
No power means no UV, and no UV means the water reaching your taps hasn’t been disinfected. Filtration keeps working, but disinfection stops.
- During an outage, don’t drink from the tap or use it for brushing teeth, ice, or cooking water. Bottled water, or boil it.
- When power returns, check the controller and confirm whether the light is green.
- Run a tap for several minutes before drinking.
3.3 Troubleshooting
The housing won’t seat
Common reasons why housings won’t seat are the O-ring or components left in the housings or filter caps from the previous filters such as gaskets. Remove the sump, clean the groove, apply a thin film of grease on the O-ring, ensure there are no extra gaskets from the previous install, and try again.
The sump won’t come off
First confirm it’s fully depressurized. A housing with pressure behind it will not turn. If the system is depressurized and the housing is still stuck, it was overtightened last time: seat the wrench square and use steady pressure.
Pressure or flow has dropped
Examining the filters is a good place to start. Replace the filters and note pressure before and after a change. If new cartridges don’t restore pressure, it isn’t a filter problem, and you may want to look at the pump, the pressure tank, and the tank level.
My water is looking yellow
Yellow or tea-colored water is generally a sign of tannins, organic matter that washes off the roof and dissolves. Standard sediment and carbon filters don’t remove it, so it requires more specialized filters to address. Feel free to contact us if you are experiencing this.
Getting help
When to stop and call
- The quartz sleeve is chipped or cracked and you don't have a spare.
- There's water inside the UV chamber, around the lamp. The sleeve seal has failed, and the system shouldn't run until it's fixed.
- A sump or a housing cap is cracked and leaking. They're pressure vessels, so a cracked one gets replaced rather than repaired.
- The filter housing still isn't seating properly after multiple attempts with a new, correctly seated O-ring.
- A housing that keeps leaking, even after a second attempt with a fresh O-ring.
- A lamp has broken inside the sleeve or the chamber.
- An alarm that won't clear with a new lamp correctly installed.
- The color or smell of your water has changed.
Reach us
We’re happy to help, whether that’s a question about something in this guide, a part you’re not sure about, or a visit to sort it out for you.
Call or text (737) 379-0277, or email hello@rainwaterexchange.com. We're in Austin and serve a radius of about two hours for service. Parts ship anywhere in the US.
rainwaterexchange.com/service-and-maintenance · rainwaterexchange.com/parts-and-guides